Shannon and I are audiobook fiends. We listen to them when we’re driving, lifting weights, working on the house, doing laundry, mowing the lawn, or doing just about any activity that doesn’t require intense mental focus. They provide true multi-tasking, effectively turning our brains into dual core processors (whoa! …geeking out again…I’ll try to keep that in check). Back when I worked in an office and had to sit in freeway traffic for an hour or two every day on the way to and from work audiobooks cured my road rage. “Sure, feel free to cut me off; I’m reading a good book! What do I care?”
The public libraries are chock full of fantastic audiobooks on CD, but getting them into iTunes in a usable format is not super-intuitive. Here’s a step-by-step guide to help you out…learned and tweaked over the last 3 years of my audiobook ripping experience. This is going to seem like a lot of work at first, but it becomes second-nature and you’ll eventually be able to do it all very quickly. You’ll even be able to handle those 47 disc James Michener and George R.R. Martin books with ease.
1. Insert the first disc. iTunes will get the book titles and track names for you from the tubez, but there’s a good chance that they’ll be mis-spelled or not quite configured the way you want them. You don’t care about the track names, but you will want the book titles to be correct.
2. Select the all of the tracks and ctrl-click (right-click) –> Get Info.
3. Fill out the info dialog with the following:
Artist: the author’s name
Album: the book title — delete any disc info such as “disc 1” or “1 of 6”
Composer: the reader’s name
Genre: Books and Spoken
Remember Position: Yes
Skip when shuffling: Yes
Disc Numbers: make sure that the disc numbers are correct

4. Click OK to dismiss the info dialog. With the tracks all still selected click Advanced–>Join CD Tracks. This rips the whole disc into iTunes as a single track. Yes, this is what you want. Audiobooks will remember your playback position automatically, so there’s no reason to get more fine-grained than per disc.
5. Bring up the iTunes Preferences dialog and go to the Advanced tab. Then click the Importing sub-tab.
Update for iTunes 8: The Importing dialog is now accessed on the General tab of the preferences dialog by clicking the “Import Settings…” button.
6. Change the Setting dropdown to “Custom…” and fill out the dialog that pops up as follows:

7. Whether you use error correction is up to you. It takes longer to rip with error correction turned on, but it can help smooth out scratched CDs. Your Importing preferences should now look like this:

8. Click OK to dismiss the prefs dialog, then click the “Import CD” button in the bottom right.

9. The track for first disc should now be showing up under Music in your iTunes library. At this point, I like to change the name of the track to include a disc number. So for the example I’ve been using so far, I changed the track name from “Predictably Irrational” to “Predictably Irrational 01/06”.

10. Repeat Steps 1-9 for each disc in the book.
11. Now we need to change the file extensions so that the book will show up under the Audiobooks menu instead of the Music menu. Select one of the tracks and ctrl-click–>Show In Finder (or “Show In Windows Explorer for non-Mac peeps).
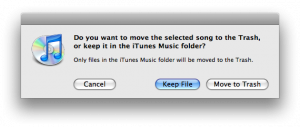
12. Delete the audiobook from iTunes, but make sure to keep the files — DO NOT select “Move to Trash”!

13. Go to the Finder (or Windows Explorer) window that you opened on Step 11. You should see all of the files for your audiobook there. They all end with the files extension “.m4a”.
14. Change the file extensions to “.m4b” (Soon I will write a little unix shell script to do this for you automatically and will post it here, but for now you’ve got to do them one at a time.)
15. Back in iTunes, go to File–>Add to Library…
16. Select the folder containing your m4b files (probably iTunes–>iTunes Music–>author name–>book_title) and click Open.
17. That’s it. The audiobook should now show up under Audiobooks in iTunes and be ready to copy to your iPod.
One more tip: During playback on your iPod, if you just select a track and play it the iPod will stop playback when it reaches the end of that track. However, if you start playback on the track before the one that you want to listen to and skip forward, then the iPod will continue on to the next track each time it finishes a track.


